ZXP Series 3

- The LCD of my control panel shows "Command Error".
- The printer won’t take my cards.
- My cards get stuck in the printer. What do I do?
- My ribbon keeps breaking.
- How do I clean the printer?
- How do I clean the printhead?
The LCD of my control panel shows "Command Error".
These messages usually appear when cards will not print and you cannot reset printer.
To fix the problem, follow these steps:
- Disconnect the interface cable from the printer.
- Go to the printer queue and cancel all jobs for that printer. Wait for all jobs to be deleted.
- Turn printer power off, wait 5 seconds, and turn back on.
You should now have a "Ready" message or a solid green light indicating the printer status is normal and it is ready for the next print job.
The printer won’t take my cards.
The Printer is unable to feed a card from the card hopper.
- Verify the card thickness setting is set to the thickness of your cards.
- Verify the Cleaning roller is properly installed on the Ribbon Cartridge.
- Check for card slippage. If necessary, run the Printer cleaning routine.
- Verify that your cards are within the accepted card size range.
- Verify the cards are not sticking together.
My cards get stuck in the printer. What do I do?
Clear the jam and try the following options:
- Run a cleaning cycle.
- Try different cards.
- Manually clean the rollers.
- Update the printer driver and firmware to the latest on Zebra’s website.
My ribbon keeps breaking.
Try the following options:
- Try a different ribbon.
- Calibrate the ribbon sensor.
- Update the printer driver and firmware to the latest on Zebra’s website.
- Try different cards.
- Verify that you are using the correct power supply.
- Manually clean the rollers.
- Lower the dye sub intensity in the print driver.
Note that you can still use a ribbon that broke by taping it back on to the take- up core.
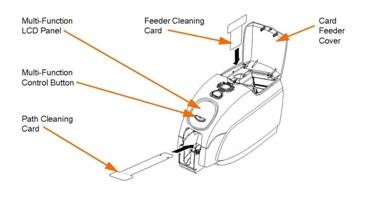
How do I clean the printer?
- Place the printer power switch in the ON position, and then press and hold the Multi-Function Control Button for 5 seconds.
- When the cleaning cycle is initiated, the LCD message REMOVE RIBBON THEN CLOSE LID will display.
- After the ribbon is removed and the lid is closed, the message EMPTY FEEDER THEN CLOSE COVER will display.
- If the lid is opened and closed without removing the ribbon, the REMOVE RIBBON THEN CLOSE LID message will remain.
- Once the ribbon is removed and the cover is closed, the firmware will eject any card inside the printer. The message EJECTING CARD will display.
- The LCD will display FEED LONG CLEANING CARD. When the presence of the cleaning card is sensed, the rollers will take the card into the printer.
- When the cleaning process is done, the printer will eject the cleaning card. If the card sensor still senses the cleaning card, the message REMOVE LONG CLEANING CARD will display.
- Once the long cleaning card is no longer sensed by the card exit sensor, the message INSERT FEEDER CLEANING CARD will display. Open the feeder cover, and insert the feeder cleaning card.
- When the feeder cleaning card has been sensed by the feeder card sensor, the message CLOSE FEEDER COVER will display.
- When feeder cleaning is complete, the message REMOVE FEEDER CLEANING CARD will display.
- After the card is removed, the LCD will display READY. You may now reload the ribbon and cards and continue printing.
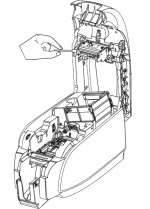
How do I clean the printhead?
- Place the printer power switch in the OFF (O) position.
- Open the printer lid by pressing the cover release button, and open the cover fully to reveal the Printhead mounted on the inside of the cover.
- Clean the Printhead by moving an alcohol-moistened swab tip side-to-side across the Printhead elements. Only use moderate force.
- Allow two to three minutes for the printhead to dry before placing the printer power switch in the ON position.


